Thursday, January 26, 2012

February Workshop Card

I thought I would give you a peek at one of the cards I will be making for my February workshops.  I love the new Sale-a-bration paper, so I used that on the background and punched out a flower from Mixed Bunch on the front.  I can't resist a little bling, so I added a big Pearl Basic to the middle of the flower and then three medium pearls on the bottom.  I love the Pool Party ribbon, too!
Created by Tammi Verbarendse
If you live in the Layton, Utah area and would like to book a Sale-a-bration party, just let me know!  I will be in Boise to do a workshop on February 17th.  I can book another party on Saturday night and/or Sunday in Boise that weekend, too.

Happy Stamping!
Tammi

Wednesday, January 25, 2012

January Wallpaper

I have had a December 2011 calendar on my computer for too long.  I decided to just make my own computer desktop wallpaper using My Digital Studio.  Quick and simple!  I added a favorite picture and I'm done.  Can't wait to do this again for February. 

If you don't have My Digital Studio from Stampin' Up! yet, then check back February 1st.  You can try it out for FREE for the whole month of February!

Happy Stamping!
Tammi

Tuesday, January 24, 2012

Sale-a-bration is finally HERE!!

One of my favorite times of year is when you get something for FREE when you place a $50 Stampin' Up! order.  That time is NOW!  Woo, hoo!  Click on the link in the right side bar to view the available items you can get FREE with each $50 order. 


Plus, you get a cute bag with a $150 order, which also qualifies you for hostess benefits and 3 FREE items!  There are even more benefits for hosting a $400 party!
AND there are even more great benefits when you sign up to become a Stampin' Up! Demonstrator during Sale-a-bration!  (Besides joining my wonderful Groovy Stampers downline!)

Contact me for more info or check out my website to place an order, book a party &/or sign up to become a demonstrator!  My Stampin' Up! website

Now I am off to place my own Sale-a-bration order and then play with some of my toys I ordered from our new Occasions mini.  To see a few of the papers, stamp sets & embellishments that are featured in the Occasions mini and the Sale-a-bration brochure, click on my 12 days of Christmas calendar postings.

Happy Stamping!!
Tammi

Saturday, January 21, 2012

Rainy Saturday - Perfect Crafting Day!

It is snowing in the mountains and raining in the valley.  I honestly love living in Utah!  The mountains look gorgeous!  It may be rainy and dreary around my house, but that just gives me the perfect excuse to craft and read today.  (After I work out, of course...)

Remember to make the most of every day... even the dreary ones!

Happy crafting!
Tammi

Friday, January 20, 2012

Finished Thursday Three Projects

I challenged myself yesterday to create three projects using three products on each one.  My items were:  masking tape, Stampin' Up! Classic Reinkers & First Edition Designer Series Paper.  I decided to create my own designer tape to use on a card and in my Art Journal.  My goal when I woke up was to watercolor over masking tape on a canvas, so that was my third project.  Here are the finished projects!
I wasn't thrilled with this card at first, so I added some clear Dazzling Details Glitter Glue to look like icing.  THEN I realized I forgot to add the First Edition DSP... what to do... I decided to cut a tiny strip off the top and cut it down to the length of each piece of tape.  NOW it looks like a birthday cake!  I drew a cherry stem with a Wild Wasabi marker and added a couple Basic Rhinestones and was done!  I'm actually pretty pleased with the outcome. 

Well... this didn't turn out as cool as I had envisioned, but I still like it.  I stamped one of the flowers from the Mixed Bunch Stamp Set in our new Occasions Mini on the painted tape with Jet Black Stazon Ink.  Then I cut pieces in half lengthwise and stuck them on the pages randomly.  I decided to do some doodling and then came up with my saying, "Doodling is Your Mind's Way of Journaling."  I will continue to add some more doodling when inspiration strikes.  ;)

My canvas turned out Really cool!  I used a paintbrush to get the whole canvas wet and then added drops of the reinkers.  I used the same colors that I used on the tape, plus Real Red and So Saffron.  I sprayed more water on top, carefully spread each color across the canvas to help spread it out.  Then I sprayed it again and tipped the canvas back and forth to blend the colors a little.  I used a hair dryer on low to help speed up the drying process.  When it was dry, I outlined the tape with a black journaler, stamped some background images from the Baroque Motifs Stamp Set in Stazon, and wrote the words "I" and "ART."  I finally took the tape off and it worked!  Most of the canvas behind the tape stayed dry!  I punched out some hearts from the DSP and added some Real Red reinker and water to dye them.  After they were dry, I added them to the canvas.  DONE!
I hope you enjoyed these projects and got at least one good idea from all of this!  :) 

Happy Stamping!
Tammi

Thursday, January 19, 2012

Thursday Three Preview

Okay... I actually accomplished this task today.  Some turned out better than others and I learned a few pointers along the way, too.  I am going to post a little preview of my projects and then post the finished three tomorrow.
I mixed some reinkers with white and black acrylic paint.  Then I painted the masking tape and let it dry.  I used Wild Wasabi, Tangerine Tango, Night of Navy & Elegant Eggplant.  I learned that I really need to buy some more reinkers in the newest Stampin' Up! colors!!

I wanted one of my projects to be in my Art Journal.  I wasn't sure what I wanted to do yet, so I put masking tape in the middle, tore some of the First Edition DSP and then painted gesso on top.

This was the project that I was planning on doing today that inspired my whole "Thursday Three" idea.  I wanted to put masking tape, that I cut in half, on a canvas and then watercolor on top with our refills.

I haven't made a card since Christmas, so I wanted to have that be my third project.  I thought it would be cool to stack my painted tape to create a cake.  I liked the saying, so I cut the prongs off an In Color Glimmer Brad and used a glue dot to stick it on top.  It still didn't look right, so I added some extra embellishments.  THEN I realized I forgot to incorporate the DSP... Check back tomorrow to see how I tied it all together!
Well... there's your sneak peek.  I hope you like these ideas and I'll see you tomorrow with the finished projects!

Happy Stamping!
Tammi

Thursday Three

Okay... I thought I would try something a little different today.  I am choosing three different products and I will try to create three different projects with them.  The items for today are pictured below:
Classic Ink Refills, First Edition DSP and masking tape
I have some great ideas in my head, so let's hope they turn out as cool when I try them!  :)  I challenge you to try using these three products, too.  If you do, feel free to leave a link to them in the comments section.

Now, before I craft, I have vowed to work out.  So... off to Zumba on the Wii!

Happy Stamping!
Tammi

Saturday, January 14, 2012

My First Finished Art Journal Page

I can't tell you how much fun it was creating this page!  I can't wait to do more!  (Of course, my husband would probably appreciate me folding all the laundry that has been piling up while I've been crafting... at least I washed it!)

I forgot to mention that I'm using a composition notebook that my sister gave me years ago.  She decorated the front with the girl from the So Cool stamp set.  (At least I think that's what it was called.)  She wrote a meaningful note inside, which is part of why I wanted flowers on the first page.

Also, I wanted to let you know that I have been walking on the treadmill while I've been doing my 'research' on YouTube.  Okay... you probably don't care about that, but it makes me feel better.  :)
The note my sister, Stacy McCain wrote me is on the left.  It fits perfectly with my page!  I decided to add a little sparkle by using my Smooch Spritz in Vanilla Shimmer and some Basic Pearls.  I also used some of the new Large Pearl Basic Jewels that are in the Occasions Mini that just came out.  I kind of flipped the edges of the flowers up and I'm done!

A closer look of the finished page.  Art Journaling by Tammi Verbarendse
Hope you enjoyed this!  Happy Stamping!
Tammi

Friday, January 13, 2012

Beginnings of an Art Journal

I have become addicted to Mixed Media projects after watching Christy Tomlinson on My Craft Channel.  I loved how she used scraps of paper and stamps on canvas and decided to check out more on YouTube... Whoa!  I didn't know what I was getting myself into!  I have found so much inspiration for canvas, which led me to even more with Art Journaling.  I suddenly HAD to try some of these techniques out!  I decorated some wooden frames for my mom and sister for Christmas, but I was still nervous to try Art Journaling.

I used to journal all the time as a teenager.  I loved getting my thoughts on paper.  The concept of Art Journaling blends my love for writing things down with creating something colorful.  What a great idea!  After lots of 'research,' I finally tried it out in my newly cleaned stamp room.  AND I actually put everything away when I was finished.  Woo, hoo! 

Here are some of the beginning steps I took and I will post the finished project tomorrow.  Don't worry... I used all current Stampin' Up! supplies, except for the products we don't carry.  I'll list them tomorrow, too.
Background created by Tammi Verbarendse using white acrylic paint and Elegant Eggplant, So Saffron & Pacific Point refills.  I painted this over a page covered in Gesso.

After watching a YouTube video by Donna Downey, I wanted to create this layout using some Jute that I glued down with our Multi Liquid Glue.

I stamped some flowers from the Vintage Vogue stamp set using the same colors as above.  I made the blue and purple flowers lighter by stamping them twice without reinking.  I cut them out and sponged the edges to make them pop.  Then I placed them where I thought I wanted them to go before gluing them down in the next step.

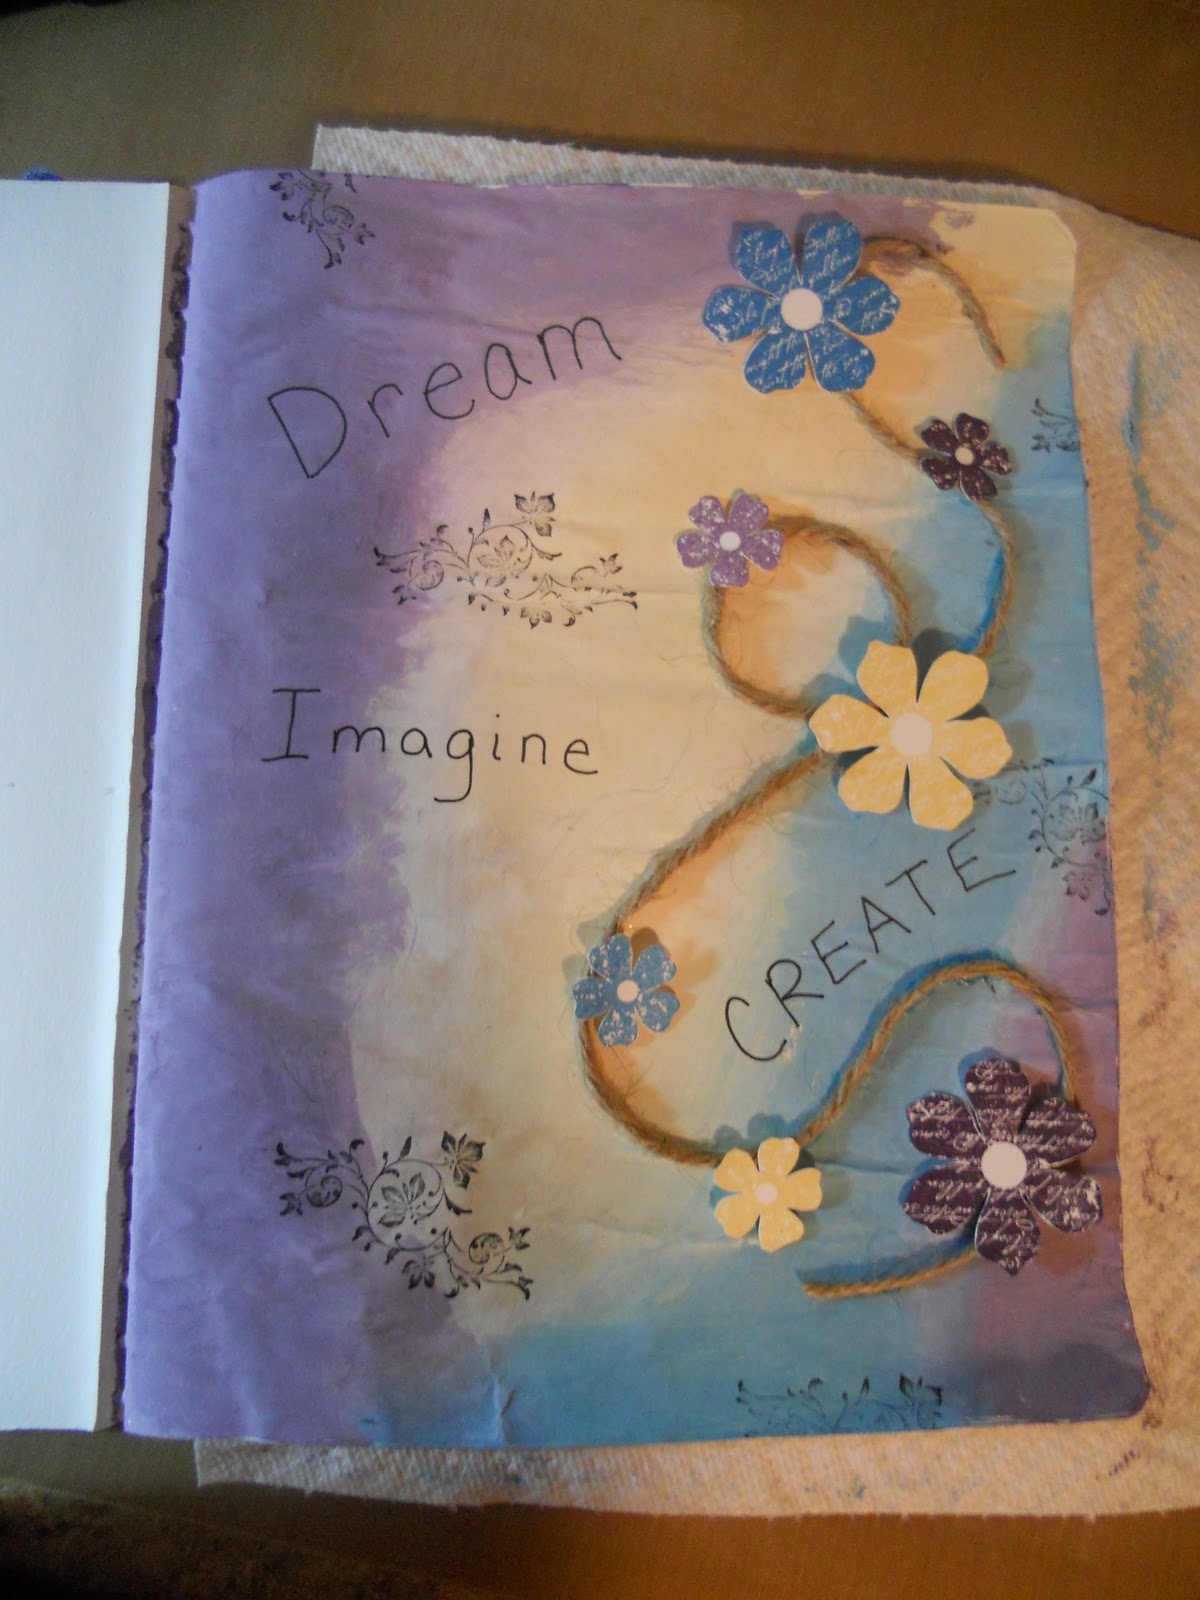
I decided to write the words Dream, Imagine and Create after reading The Art Journal Workshop by Traci Bunkers.  I stamped a few more images from Vintage Vogue using Jet Black Stazon before attaching Dimensionals to the flowers.  I wanted to make sure they stayed on the painted surface, so I added some of the Multi Liquid Glue to the back of each Dimensional.
I'm almost done, but I added a couple more steps.  Check back tomorrow to see the finished page.

Enjoy!
Tammi

Cleaning my Craft Room

I wanted to show you what I have accomplished this week, since I haven't really been crafting.  My husband made me another cool craft room in our new house, so I wanted to move some things around and have more space for crafting.  I made these really cool punch holders from IKEA (okay... my Grandpa Calvin put them together for me, but I decorated them.) and I wanted to move them off my counter.  I bought this really cool 6 cube shelf and they fit perfectly.  I have 9 cube one in my closet!

My punch holders under my white board.  My die cutting supplies and ink pads are also over there.

My hide-a-bed, although we now have a queen in Kye's room.  Great for relaxing and reading through craft magazines and books.

My work space.  I put all my essential supplies in my cabinets, so I can just grab them when I am ready to craft.  I'm trying to keep my computer in here, too.  I searched through 3 different rooms/boxes to find the cords to hook up my PictureMate printer, too.  Ready to craft!!

My actually organized closet.  It's been organized since we moved in.  Thanks again, Mom for all your help!
Now to get to my 30 minutes of walking, so I can craft without the guilt later.  ;)

Happy Crafting!
Tammi

Tuesday, January 10, 2012

Playing around with My Digital Studio

One of these days, I'll come up with a consistent plan for blogging certain projects.  Until then, I'll just be random.  :) 

Created with My Digital Studio by Tammi Verbarendse
I'm trying to clean and re-organize my stamp/craft room, but wanted to take a little creative break.  I'm just playing around with My Digital Studio and decided to do a mini art journaling page.

Enjoy!
Tammi

Wednesday, January 4, 2012

New Occasions Mini is Here!

Check out the all new mini catalog by clicking on the link on the right side bar.  I will be working on some projects this week, so I will post some pics as soon as I have them ready.  Have fun looking through all the amazing stamp sets, paper, die cuts and accessories!

Happy Stamping!
Tammi

Sunday, January 1, 2012