Showing posts with label Art Journaling. Show all posts

Monday, June 29, 2015

My New Craft Closet

So it's not quite the weekend, but I was close!  :)  I wanted to show you the before, during and after pics of my new under-the-stairs craft closet.  I had to try and purge a ton of craft items to fit as much as I could in my closet, so my guest room can really be a guest room.  I am still storing a lot of my paper and larger kits in the guest room closet.  I haven't sorted through all the designer paper yet. 

In case you forgot what my 'before the move' pictures looked like.  As you can see, I was a bit preoccupied with life.  I had a lot of time to create a mess, but no time to clean... I guess.
My Utah craft closet...  It was actually still pretty organized.
My new storage closet... Trying to see how the different sized items fit.
First try.  I liked the space that I had in front of my 9 shelf unit, but I new I had a lot more stuff to store...
Added my 9 drawer unit and thought it fit perfectly!  I still have room next to it to get to the shelves behind it on the left.
I am finally happy to be #verticallychallenged!  I can still get to everything!
Everything is stored and now labeled! 
 I love pink and washi tape, so I had some fun with that and my label maker.
I still love my ribbon and wheel holder that my original up-lines husband made me.  I don't have a lot of wheels anymore, but it can store items like washi tape, too.  Thanks again, Zane Bowerman!!
Using the inside of my door to hang my aprons, convention tags, and even one of my convention bags!
I love my little teacher cabinet, so I thought it would look cute in the corner.
Guess what!  My cabinet was the perfect size to store my Stampin' Up! ink pads and I can add the extras inside!  I love how my other ribbon/wheel/washi tape holder looks above it!
Okay... here is my desk before I started sorting through all my bins.  Pretty clear... for about a second.
Just so you don't think that everything was organized...  We are hoping to contact the people who put in our cabinets in the rest of the house to add matching cabinets above my crafting desk.  I'm hoping my 8 1/2" x 11" cardstock can fit inside, so I can clear that off my desk eventually.
Now... I was lucky enough to get my husband to take me to IKEA yesterday to buy some bookshelves for our guest room and look what else I found... A pink shelf unit!  I even put it together myself.  So proud!  I also added some more pink boxes to fill with fun planning accessories.  Can you tell what my favorite color is?  #ILovePink!!
 
Well, what do you think?  I still have some work to do in the guest room to get it all organized with my teacher items and other crafting paper/kits.  I will try to show you some pics of that room when I am done.  Hopefully tomorrow!  You can always see my pics on Instagram @chattymamav
 
Have a fabulous week!!
Tammi 

Friday, January 20, 2012

Finished Thursday Three Projects

I challenged myself yesterday to create three projects using three products on each one.  My items were:  masking tape, Stampin' Up! Classic Reinkers & First Edition Designer Series Paper.  I decided to create my own designer tape to use on a card and in my Art Journal.  My goal when I woke up was to watercolor over masking tape on a canvas, so that was my third project.  Here are the finished projects!
I wasn't thrilled with this card at first, so I added some clear Dazzling Details Glitter Glue to look like icing.  THEN I realized I forgot to add the First Edition DSP... what to do... I decided to cut a tiny strip off the top and cut it down to the length of each piece of tape.  NOW it looks like a birthday cake!  I drew a cherry stem with a Wild Wasabi marker and added a couple Basic Rhinestones and was done!  I'm actually pretty pleased with the outcome. 

Well... this didn't turn out as cool as I had envisioned, but I still like it.  I stamped one of the flowers from the Mixed Bunch Stamp Set in our new Occasions Mini on the painted tape with Jet Black Stazon Ink.  Then I cut pieces in half lengthwise and stuck them on the pages randomly.  I decided to do some doodling and then came up with my saying, "Doodling is Your Mind's Way of Journaling."  I will continue to add some more doodling when inspiration strikes.  ;)

My canvas turned out Really cool!  I used a paintbrush to get the whole canvas wet and then added drops of the reinkers.  I used the same colors that I used on the tape, plus Real Red and So Saffron.  I sprayed more water on top, carefully spread each color across the canvas to help spread it out.  Then I sprayed it again and tipped the canvas back and forth to blend the colors a little.  I used a hair dryer on low to help speed up the drying process.  When it was dry, I outlined the tape with a black journaler, stamped some background images from the Baroque Motifs Stamp Set in Stazon, and wrote the words "I" and "ART."  I finally took the tape off and it worked!  Most of the canvas behind the tape stayed dry!  I punched out some hearts from the DSP and added some Real Red reinker and water to dye them.  After they were dry, I added them to the canvas.  DONE!
I hope you enjoyed these projects and got at least one good idea from all of this!  :) 

Happy Stamping!
Tammi

Thursday, January 19, 2012

Thursday Three Preview

Okay... I actually accomplished this task today.  Some turned out better than others and I learned a few pointers along the way, too.  I am going to post a little preview of my projects and then post the finished three tomorrow.
I mixed some reinkers with white and black acrylic paint.  Then I painted the masking tape and let it dry.  I used Wild Wasabi, Tangerine Tango, Night of Navy & Elegant Eggplant.  I learned that I really need to buy some more reinkers in the newest Stampin' Up! colors!!

I wanted one of my projects to be in my Art Journal.  I wasn't sure what I wanted to do yet, so I put masking tape in the middle, tore some of the First Edition DSP and then painted gesso on top.

This was the project that I was planning on doing today that inspired my whole "Thursday Three" idea.  I wanted to put masking tape, that I cut in half, on a canvas and then watercolor on top with our refills.

I haven't made a card since Christmas, so I wanted to have that be my third project.  I thought it would be cool to stack my painted tape to create a cake.  I liked the saying, so I cut the prongs off an In Color Glimmer Brad and used a glue dot to stick it on top.  It still didn't look right, so I added some extra embellishments.  THEN I realized I forgot to incorporate the DSP... Check back tomorrow to see how I tied it all together!
Well... there's your sneak peek.  I hope you like these ideas and I'll see you tomorrow with the finished projects!

Happy Stamping!
Tammi

Saturday, January 14, 2012

My First Finished Art Journal Page

I can't tell you how much fun it was creating this page!  I can't wait to do more!  (Of course, my husband would probably appreciate me folding all the laundry that has been piling up while I've been crafting... at least I washed it!)

I forgot to mention that I'm using a composition notebook that my sister gave me years ago.  She decorated the front with the girl from the So Cool stamp set.  (At least I think that's what it was called.)  She wrote a meaningful note inside, which is part of why I wanted flowers on the first page.

Also, I wanted to let you know that I have been walking on the treadmill while I've been doing my 'research' on YouTube.  Okay... you probably don't care about that, but it makes me feel better.  :)
The note my sister, Stacy McCain wrote me is on the left.  It fits perfectly with my page!  I decided to add a little sparkle by using my Smooch Spritz in Vanilla Shimmer and some Basic Pearls.  I also used some of the new Large Pearl Basic Jewels that are in the Occasions Mini that just came out.  I kind of flipped the edges of the flowers up and I'm done!

A closer look of the finished page.  Art Journaling by Tammi Verbarendse
Hope you enjoyed this!  Happy Stamping!
Tammi

Friday, January 13, 2012

Beginnings of an Art Journal

I have become addicted to Mixed Media projects after watching Christy Tomlinson on My Craft Channel.  I loved how she used scraps of paper and stamps on canvas and decided to check out more on YouTube... Whoa!  I didn't know what I was getting myself into!  I have found so much inspiration for canvas, which led me to even more with Art Journaling.  I suddenly HAD to try some of these techniques out!  I decorated some wooden frames for my mom and sister for Christmas, but I was still nervous to try Art Journaling.

I used to journal all the time as a teenager.  I loved getting my thoughts on paper.  The concept of Art Journaling blends my love for writing things down with creating something colorful.  What a great idea!  After lots of 'research,' I finally tried it out in my newly cleaned stamp room.  AND I actually put everything away when I was finished.  Woo, hoo! 

Here are some of the beginning steps I took and I will post the finished project tomorrow.  Don't worry... I used all current Stampin' Up! supplies, except for the products we don't carry.  I'll list them tomorrow, too.
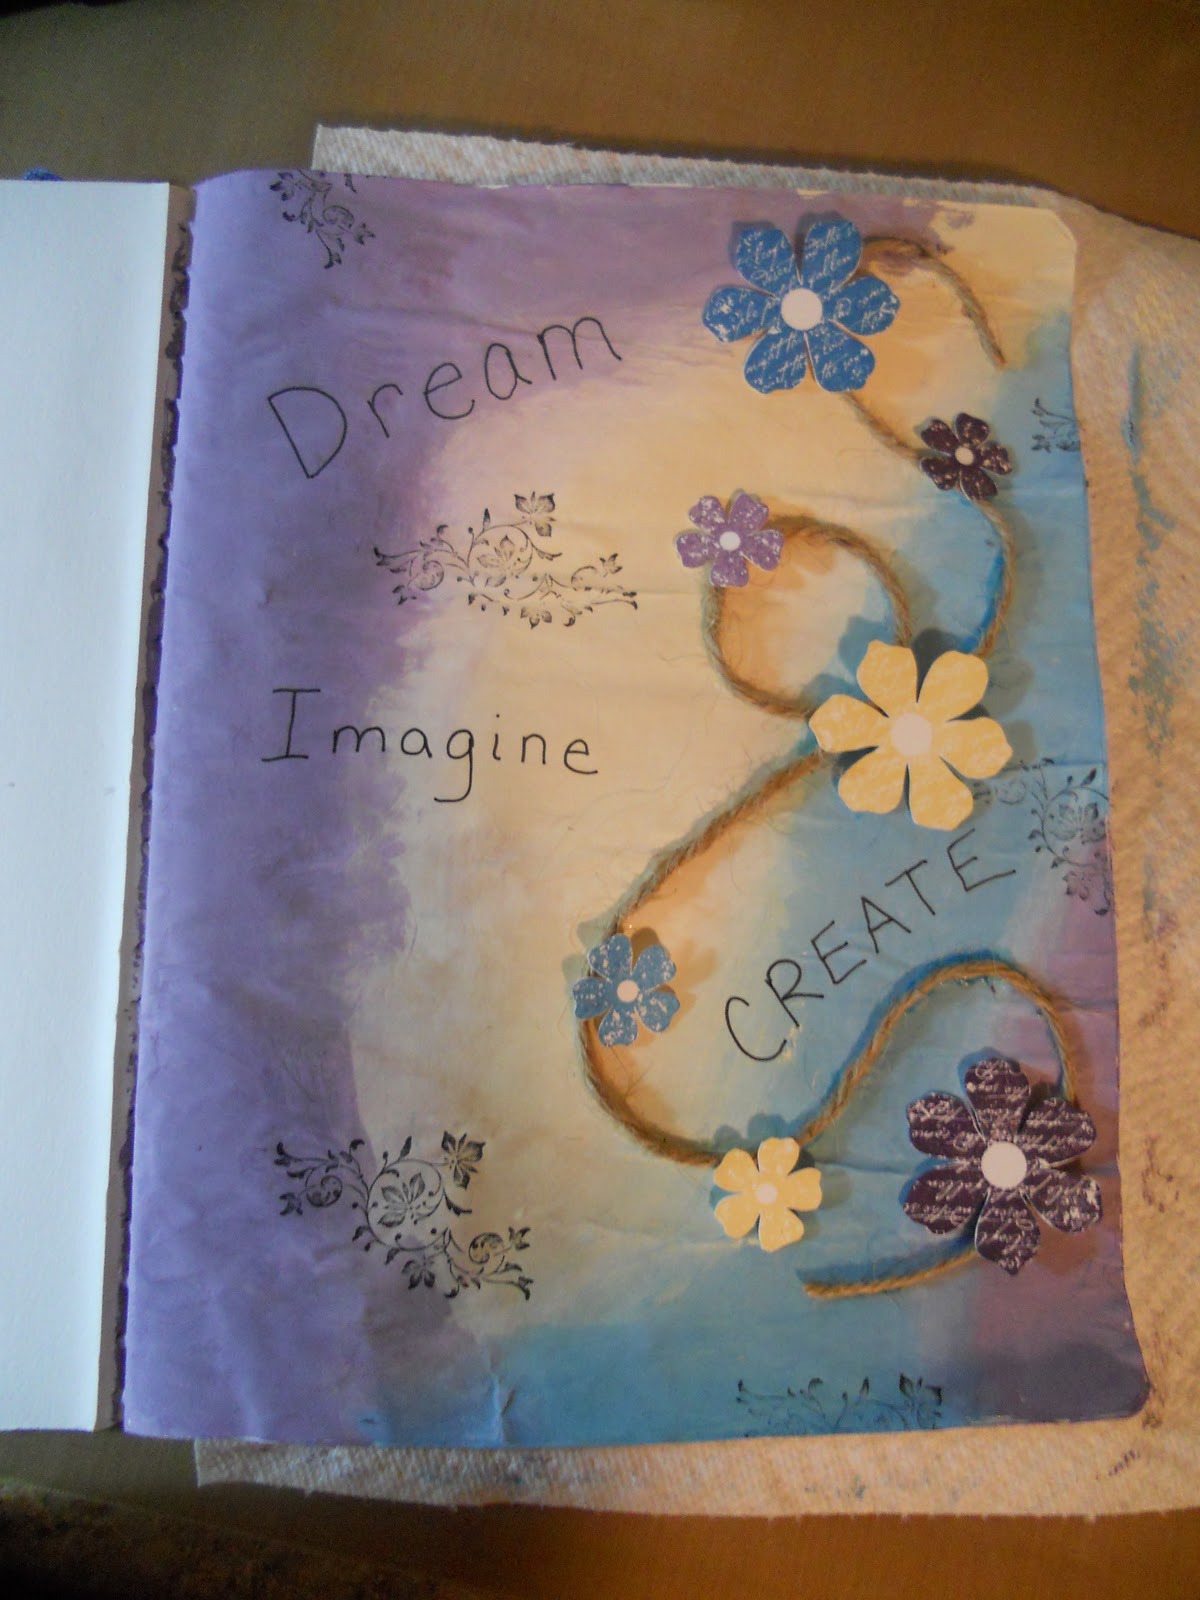
Background created by Tammi Verbarendse using white acrylic paint and Elegant Eggplant, So Saffron & Pacific Point refills.  I painted this over a page covered in Gesso.

After watching a YouTube video by Donna Downey, I wanted to create this layout using some Jute that I glued down with our Multi Liquid Glue.

I stamped some flowers from the Vintage Vogue stamp set using the same colors as above.  I made the blue and purple flowers lighter by stamping them twice without reinking.  I cut them out and sponged the edges to make them pop.  Then I placed them where I thought I wanted them to go before gluing them down in the next step.

I decided to write the words Dream, Imagine and Create after reading The Art Journal Workshop by Traci Bunkers.  I stamped a few more images from Vintage Vogue using Jet Black Stazon before attaching Dimensionals to the flowers.  I wanted to make sure they stayed on the painted surface, so I added some of the Multi Liquid Glue to the back of each Dimensional.
I'm almost done, but I added a couple more steps.  Check back tomorrow to see the finished page.

Enjoy!
Tammi